Hexo & Next
阅读本篇之前,假定读者已经有了Node.js的基础,如需要补充Node.js知识的,请自行百度。
Hexo是在Node.js框架下的一个项目,利用Node.js提供的强大功能,完成从Markdown到静态网页的转换。
NexT是Hexo项目下的一个主题插件,提供可高度定制的页面外观。
1. 我们要做什么
- 搭建Node.js环境
- 下载Hexo项目
- 下载NexT的主题插件
- 运行博客
2. 在Windows系统下安装Node.js
在Windows下,Node.js的核心是命令行可执行文件Node.exe。无论安装版或者绿色版,只要满足以下两个基本条件,Hexo即可运行。
node.exe在命令行控制台的当前文件夹,或者可以通过系统环境变量path找到。Node.js相关的工具包(如npm,实际上是Windows脚本文件npm.cmd)在命令行控制台的当前文件夹或者可以通过系统环境变量path找到。
注意:npm是Node.js自带的模块包管理工具,跟node.exe位于同一文件夹。Hexo项目也是提供了命令行工具hexo.cmd。这个项目被所有的实例共享,Hexo一般应全局安装。它的hexo.cmd所在文件夹应被放入系统path变量中。
安装Node.js
上面的信息对Windows老司机已经足够。本节余下内容请老司机略过。
把下载包解压缩到你希望安装的文件夹,比如
D:\DevelopTools\Nodejs\。任选下面一种方式把
Node.exe的路径放到系统path变量中去。修改path变量后,只有在新打开的命令行窗口中生效。使用
setx命令setx PATH "%PATH%;D:\DevelopTools\Nodejs\;" /M直接修改注册表
用注册表编辑器打开
HKEY_LOCAL_MACHINE\SYSTEM\CurrentControlSet\Control\Session Manager\Environment,在path变量后追加;D:\DevelopTools\Nodejs\;。在
我的电脑上点击右键,选择属性,选择高级系统设置,选择高级,选择系统变量,在path变量中追加上述路径。
以下面任意方式设置包的全局安装位置,假设其位置为
d:\node_global。- 用
npm命令npm config set prefix ="d:\node_global"。 - 直接打开
C:\Users\Administrator\.npmrc文件,增加或修改其中的prefix=d:\node_global。
- 用
参照3的方式把Node.js包的全局安装路径
d:\node_global放到系统path变量中去。运行
node -v和npm -v,显示正常的版本则说明安装完毕。
补充:国内环境下把包的远程服务器设置为淘宝镜像,以加快下载速度。
- 使用命令行运行
npm config set registry=https://registry.npm.taobao.org/。 - 或者,直接修改
C:\Users\Administrator\.npmrc文件,增加一行registry=https://registry.npm.taobao.org/。
3. 安装或下载Hexo项目
官方推荐采用npm进行安装。
npm install hexo-cli -g |
上面的命令会把hexo.cmd安装到全局包仓库中,由于该仓库文件夹在Windows系统的path中。所以你就可以在任意位置执行hexo命令了。
执行一下命令确认hexo安装完好。
hexo -v |
该命令会显示hexo的版本及依赖的包。
4. 安装或下载NexT主题插件
通过git指令下载NexT最新的主题文件。
git clone https://github.com/iissnan/hexo-theme-next themes/next |
或者,直接从发布页https://github.com/iissnan/hexo-theme-next/releases下载源指定版本源代码。
Assets 2
下载之后,解压缩主题主题文件,并把它放到themes
主题文件放在
+---public |
在站点配置文件_config.yml里面,找到它
# 原来的值是landscape |
5. 创建及运行博客
创建一个空白文件夹,作为博客根目录,在该根目录下,初始化博客
hexo init
1
把主题文件拷贝到博客文件的
theme下面执行
Hexo提供的服务器命令。hexo serve
1
控制台显示:
INFO Hexo is running at http://localhost:4000 . Press Ctrl+C to stop. |
在浏览器地址栏里面输入http://localhost:4000,就可以访问博客了。
重要信息
本文章用到的项目版本
hexo:3.8.0
NexT:5.1.2
1. Hexo站点配置文件详解
Hexo版本为3.8.0,版本不同可能有不同
# Hexo Configuration |
- NexT主题配置文件详解
Hexo版本-3.8.0,NexT版本-5.1.4
NexT主题配置文件详解
# --------------------------------------------------------------- |
采用Hexo及NexT搭建好网站以后,有些效果不是我们需要的,Hexo及NexT提供了强大的定制功能,本文章将要讲解的就是如何在对网站进行配置及调整,达到博主需要的效果。
本文章配置环境是Hexo 3.8.0+`NexT 5.1.4,主题自身已经提供的功能,仅需要配置即可完成。
下一篇文章将讲解采用第三方插件的来实现不通的功能,同时更深入地讲解如何编写Hexo插件。
定义文章的永久链接
网站中的文章(post类型)会按照规定的规则形成永久链接,每个页面生成一个静态文件。通过永久链接在主页(index),分页页(page)、分类索引页(category),标签索引页(tag)等页面中引用。永久链接的生成规则可以自定义。
在站点配置文件中找到如下代码,并定义
permalink: post/:year-:month-:day-:title/ |
上面冒号(:)开头的是网站的变量,还可以使用下列变量
| 变量 | 描述 |
|---|---|
:year | 文章的发表年份(4 位数) |
:month | 文章的发表月份(2 位数) |
:i_month | 文章的发表月份(去掉开头的零) |
:day | 文章的发表日期 (2 位数) |
:i_day | 文章的发表日期(去掉开头的零) |
:title | 文件名称 |
:year、:month、:day这几个变量的值,如果在markdown的front matter区内定义了文章的发表日期date: 2019-03-01 08:08:08,则采用该值。如果没有包含,而在文件名中包含了日期,则系统也可以采用这些值,比如文件名为2019-03-03-my-first-blog.md的文章,就可以获得年份为2019,月份和日期均为03。
配置或新建菜单
全站的菜单作为网站的标准组成部分,它体现为一个数组,主要由主题来维护,也主要在主题中使用。
菜单有几个要素,菜单图标名,它的链接,以及它所对应的显示文字。NexT中已经有一些内置的菜单了,如果要对齐进行定制或者新建,可以按照下列方式。
在主题配置
config.yml文件中,打开内置或者新建菜单,并在||后面指定其图标名,图标取自FontAwesome,如不指定,默认为问号图标。(在NexT 5.1.4中,菜单图标名和图标定义在一起)menu:
home: / || home # 菜单对应的链接及图标名
about: /about/ || about
mymenu: /menuname/
1234如果在上面定义了一个菜单名为
menuname,如未定义,则默认链接为/,默认图标为问号,默认显示名为menuname。在主题配置
config.yml中打开或关闭图标显示功能menu_icons:
enable: true #先要打开显示图标的开关
12如果站点配置文件中指定了语言,那么就可以对现今或者内置的菜单显示文件进行修改,打开
\themes\next\languages\下对应语言的文件,找到如下位置进行修改或新建。menu:
home: 首页
archives: 归档
123如果在__主题配置__中定义了菜单项,但是没有对应的语言文件,则从
\themes\next\languages\default.yml中取默认名字。
自定义文章页面宽度
NexT中, 对文章的页面宽度,默认设定如下:
- 700px,当屏幕宽度 < 1600px
- 900px,当屏幕宽度 >= 1600px
- 移动设备下,宽度自适应
当浏览器屏幕较宽时,页面两侧有较大空白,不太美观。可以通过调整 source/css/_variables/custom.styl 文件的内容来控制两侧空白的宽度,打开该文件,修改或新增如下内容:
// 把700或900修改为你期望的宽度 |
这对NexT的一般Scheme在有效。但Pisces Scheme特殊,需要同时修改 header、.main-inner和 .content-wrap 的宽度。
打开source/css/_schemes/Picses/_layout.styl 文件,找到并把相应内容修改为如下值(共3处)。
# 修改位置 1 |
构造门面模式,增加阅读全文按钮
网站的主页,默认是把所有的文章按顺序先后排列,要想浏览后面的文章必须把大幅度拖动鼠标。NexT可以在主页中列表显示每篇文章的摘要,把正文隐藏,缩短每篇文章篇幅,在摘要结束展现一个全文阅读按钮,点击之后显示全文。
NexT提供了内置标签,在文章的摘要和正文之间添加如下代码行。
<!--more--> |
该代码转换为全文阅读按钮。
显示宽屏图片
在一篇文章内嵌到页面框架中后,他的内容一般限制在div内。如果我们在门面模式中需要一张图片,比框架预留的宽度稍宽,效果相当不错。
NexT在0.4.5以上版本中,提供了内置标签fullimage,可以达到这个效果,用法如下。
<!-- 标签 方式,要求版本在0.4.5或以上 --> |
效果图
打开文章的资源文件夹功能
NexT提供了资源文件夹功能,该功能把文章同位置同名文件名下的对象,作为文章资源对象。
文章中使用的资源对象,在主页,归档和标签的页面中对应的链接url也被自动处理,从而使其获得正确的链接地址,防止链接失效。
文章和资源文件示例如下:
| 2019-03-03-00-the-index-of-make-a-blog-by-hexo-on-windows.md # 文章名 |
功能使用方法如下:
打开站点配置文件,找到下列配置,并设置为true:
post_asset_folder: true # 默认值false,关闭文章资源文件夹功能 |
资源对象使用方式有如下几种:
用
asset_img标签把图片资源对象插入文档,可以带提示文字作为参数。{% asset_img 资源对象名 提示文字 %}
1效果:
用
asset_path显示资源文件的全路径。它的用法是。{% asset_path 资源对象名 %}
1直接在markdown文章中写入:
<img src="{asset_path full-image.jpg %}/>"
1
效果:
用
asset_link把资源对象处理为链接目标,需要带链接显示文字。{% asset_link 资源对象名 显示文字 %}
1效果:
在
fullimage内嵌标签中也可以使用资源对象{% fullimage 资源对象名, 替代文字, 标题 %}
1效果:
增加支付宝和微信打赏功能
NexT主题已经集成了打赏的功能,只要在配置文件中打开开关即可。
在主题配置文件中找到下列代码,去掉#,并把打赏图片和存放路径对应上即可。(/引导符号表示网站根目录)
reward_comment: 坚持原创,您的支持将鼓励我继续创作 |
把收钱码图片拷贝到主题或者网站目录的souces/images文件夹下面(跟上面对应)。
打开themes\next\layout\_macro\reward.swig文件,修改打赏按钮和图片下方的文字。
# 改动1:把下方的Donate改为赏,对应打赏按钮 |
打赏功能也支持其他比如比特币的打赏,只要文字,图片对应即可。
修正打赏说明文字闪动问题
当前主题中,当鼠标移动到打赏图片下方的文字上时,文字会非常怪异地闪动,如果不喜欢,可以修改去掉。
打开themes\next\source\css\_common\components\post\post-reward.styl文件。把其中的#wechat:hove p和#alipay:hover p以及#bitcoin:hover p样式采用双斜杠//注释掉。
//#wechat:hover p{ |
设置网站博客肖像
打开 主题配置文件 找到Sidebar下面的Avatar字段
# Sidebar Avatar |
这是头像的路径,只需把你的网站头像图片命名为header.jpg(其他名字也可以)放入themes/next/source/images中,将avatar的路径名改成你的头像名就OK啦!
效果如图
设置页面动态背景
打开主题配置文件next/_config.yml,修改以下代码就可以了:
动态特效:该特效打开的是3条线段追踪鼠标
# Canvas-nest |
3D特效:该特效由三维js库提供的三维动态背景
# three_waves |
线条特效:该开关的打开,在背景上显示较长线条及小球。
canvas_lines: false |
球状特效:该开关在背景上显示一个球状图案。
canvas_sphere: true |
特别注意,上述四种特效,可以独立设置,也可以叠加
设置网站缩略图标
一般来说把favicon.ico放到网站目录的根目录下,浏览器就会使用该缩略图。
随着浏览器的发展,以及各家不断加入自己的定制内容。
favicon: |
建议采用ico格式的缩略图,其他图可能存在兼容性问题。
去掉文章目录标题的自动编号
NexT提供了标题编号自动提取功能,并且默认打开。如果博主希望自己管理标题编号,可关掉自动编号功能。
打开主题配置文件,找到。
toc: |
把number后面的true修改为false。
自定义头部区域背景图
在Prisse Theme中,是不是清一色的黑色让你非常不爽啊,我也不爽。
我想要一个不一样的的效果,比如在加一个背景图片。我的副标题是“面朝大海,春乱花开”,我想来一张应景的图片。
找到如下themes\next\source\css\_custom\custom.styl 文件,添加
.site-meta { |
log-big.jpg也可以是其他名字。log-big.jpg的大小为992×112,log-small.jpg的大小为240×112,大了只能显示部分,小了可以重复铺满。
注意:在bootstrap中,显示设备宽度<768px为便携设备,<992px为小设备,<1200px为常规设备,大于等于1200px为宽屏幕设备。
正常状态下的效果图
窄屏状态下的效果图
增加百度统计分析功能
- 访问百度统计http://tongji.baidu.com网站,注册。进入
管理菜单,在网站列表下面注册网站并获得访问代码如下。
<script> |
- 这是一段JavaScript脚本代码。把它放入所有页面的
<head>标签最前方,就可以实现访问统计,其中ce33112f521e07dfe453757625e4XXXX是你网站的标识码。 - 在NexT中,这段代码已经放入
themes\next\layout\_third-party\analytics\baidu-analytics.swig,通过include,当满足条件是就会植入页面头部。 - 在主题配置中,设置
baidu_analytics的值,也就是上面说的标识码,然后植入页面头部代码就会生效。
baidu_analytics: ce33112f521e07dfe453757625e4XXXX |
利用插件实现字符统计及阅读时长估计
统计文章中的字符,根据字数估算阅读时间,这个功能是通过插件hexo-wordcount来实现的。
- 安装插件
npm install hexo-wordcount --save |
- 打开
主题配置文件进行配置
# Post wordcount display settings |
效果如图:
用leancloud记录访问次数
NexT也集成了leancloud,在leancloud官网
中注册账号,获得app_key和app_id,然后在主题配置文件中进行如下配置。
# Show number of visitors to each article. |
然后在leancloud的控制台中的存储内添加一个Counter的class,这样就可以记录我们每页的浏览量了。
网站评论系统需要维护用户,用户的留言,因此需要用到数据库。轻博客不具备这些功能,需要借助第三方提供的服务。
在NexT5.1.2版本中,集成了如下第三方的评论系统,只需要在主题配置中就可以打开相应功能。
- disqus
- 畅言
- 多说
- 有言
- hypercomments
- 来必力
其中disqus、hypercomments和来必力是国外的,访问效果可能受影响,多说和有言好像也关闭了,畅言目前可用。
评论系统一个足够,在主题配置中进行相应配置,如果打开多个,会根据themes\next\layout\_third-party\comments\index.swig中的顺序,前面配置成功,后面的就无效了。
以畅言为例,只需要在主题配置中打开下列配置。
changyan: |
填入从畅言网站获得的appid和appkey即可开启评论。
给博客添加网站地图sitemap
搜索引擎每天让蜘蛛在网站爬行来抓取页面,网站地图的作用就是给主动给蜘蛛喂数据,网站地图位于网站根目录下,有sitemap.html和sitemap.xml两种格式。百度搜索引擎及多数搜索引擎使用html格式,谷歌使用xml格式。
两步完成网站地图自动生成功能。
**安装网站地图生成插件**
npm install hexo-generator-sitemap --save |
重新启动hexo,系统会在public根目录下生成sitemap.xml文件。
给网站设置RSS订阅
1、先安装 hexo-generator-feed 插件
$ npm install hexo-generator-feed --save |
2、打开 站点配置文件 找到Extensions在下面添加
# RSS订阅 |
3、打开 主题配置文件 找到rss,设置为
rss: /atom.xml |
添加搜索功能
在网站内部提供搜索功能,可以进行全文搜索。
1、安装 hexo-generator-searchdb 插件
$ npm install hexo-generator-searchdb --save |
2、打开 站点配置文件 找到Extensions在下面添加
# 搜索 |
3、打开 主题配置文件 找到Local search,将enable设置为true
4、效果如图
添加畅言评论系统
提供网站评论的网站很多,但由于是第三方免费服务,也许说停就停了。但既然是做静态网站博客,涉及到存储和交互的也只能采用第三方的了。
这里选择畅言作为第三方。
1、进入畅言官方网站注册。
2、登录完成之后,进入后台预览,下方找到畅言秘钥,获得APP KEY和APP ID。
3、打开 主题配置文件 找到changyan,对应进行配置。
# changyan |
畅言需要网站做备案,但是你完全可以借用朋友已经备案的域名和备案号,通过审核后再改为自己的域名,然后备案下来了再修改回来。
用hexo-neat压缩文件
hexo-neat作为一个hexo插件出现,他支持压缩html、css和js文件,可以消除hexo生成网页过程中留下大大片空白,压缩输出文件的体积。使用方法如下:
使用
npm安装hexo-neat插件$ npm install hexo-neat --save
1在站点配置文件中打开开关。
neat_enable: true  #打开总开关
neat_html:
  enable: true      #打开压缩html文件开关
  exclude:          #html的排除列表

neat_css:
  enable: true      #配置CSS文件开关
  exclude:
    - '**.min.css'   #配置排除文件

neat_js:
  enable: true       #js压缩开关
  mangle: true       #是否破坏文件名
  output:            #是否输出log日志,默认为true
  compress:
  exclude:
    - '*.min.js'     #js文件压缩排除列表
1234567891011121314151617
对于插件,除了日志输出外,用户基本无感。
Hexo+NexT介绍到这里,我认为已经可以很好地完成任务了。它所提供的一些基础功能及配置,都已经进行了讲解。你已经可以随心所欲地配置一个自己的博客环境,然后享受码字的乐趣。
把博客托管到Github上,是个很好的想法,没有自己空间的博主肯定很欢迎。其实文章编译之后,他就是一个非常简单的静态网站。部署的目的就是简单的把静态网站文件夹拷贝到Github的一个仓库里,然后把这个仓库当作一个网站文件夹,仅此而已,非常简单。所以,没有讲的价值。
但是,作为一个Coder,研究了Hexo,总得来点真本事,提出一个方案,解决一个痛点,然后实现它。
痛点当然有,每次用Typora码文章,习惯对文中图片所见即所得,无奈,Typora对图片的处理方式,Hexo不认可,转换之后url错乱,无法识别。所以,我希望Typora和Hexo用统一的方式处理图片,在Typora中和Hexo编译之后都可以正常显示。
没有人解决,我就想解决它。
1. Typora的图片和NexT的资源文件的统一
在Typora中,图片可以采用相对位置保存,并且可以用文章文件名进行灵活定制。如果我们在Typora中,把图片的保存位置指定为与文章同名的文件夹,那么跟NexT提供的资源文件夹就不谋而合了。
在Typora中,把图片的存储位置设置为./${filename},见图。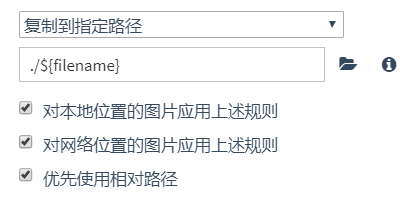
在NexT的主题配置文件中,打开资源文件夹功能,Hexo编译时会把资源文件夹下的资源对象,根据引用它的页面而赋予相应的url。
post_asset_folder: true |
如果,我们把这两者统一起来,在markdown文章中我们能够在文章编译为html之前,实现这样的转换
 => {%asset_img sample.jpg%} |
那就幸福了:在Typora下采用使用图片,享受所见即所得,在编译过程中转化为资源文件,自动获得,正确的url,鱼与熊掌兼得,完美。
2. 解决思路
2.1 了解Hexo运作模式
研究Hexo的项目结构,主要研究页面的编译过程,也就是Hexo g命令是如何执行的。
根据Hexo的概述,Hexo项目的执行过程如下:
- 初始化
- 载入文件
- 执行指令
- 结束
第一步:初始化
初始化阶段,会创建Hexo实例,各种配置,各种插件,各种扩展全部就位,就等待载入文章进行处理。
Hexo通过项目包管理文件package.json引入各种插件扩展。
第二步:载入文件
载入source下所有的文章及样式、脚本等资源。如有指令,则可以监控该文件下面文件的变化。
第三步:执行指令
执行控制台指令,根据指令执行相应的命令。
第四步:退出
2.2 着手点
需要达成的目的,主要在编译页面的过程中,也就是主要在渲染render阶段。
从Hexo的源代码中固然可以找到蛛丝马迹,但是这太麻烦了,速度也不快。有没有其他的方式。
换换思路,研究下Hexo提供的API,突然发现,其中的扩展是这样的。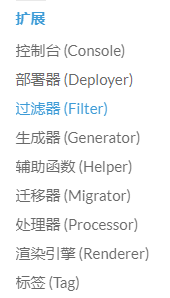
基本上所有的扩展都能够望文生义,最有可能入手的地方就是Filter过滤器。
把它的定义摆上来:
hexo.extend.filter.register(type, function(data){ |
type是类型,表示过滤器的类型,过滤器的类型是什么意思?好吧,看看有什么类型before_post_render、after_post_render、before_exit、before_generate,这就是过滤器的插入时机啊。function(data)是回调函数,这个很好地理解,其中的data是什么,回头再说。priority,type是过滤器的插入时机,如果在同一时机插入多个过滤器,那么就由priority来决定执行先后顺序,`priority值小就先执行。
重点在render
在上面的过滤器类型(就是过滤器的插入点)中,有一个重要的类型是before_post_render,意思就是在渲染之前执行过滤器。查一下Hexo的API,渲染的过程如下:
- 执行
before_post_render过滤器- 使用 Markdown 或其他渲染器渲染(根据扩展名而定)
- 使用 Nunjucks 渲染
- 执行
after_post_render过滤器
好啊,那么我们拿before_post_render来尝试一下。
2.3 编写一个过滤器
找一个例子学习一下
从https://hexo.io/plugins/里面找一个简单的过滤器例子,发现它就是一个特别简单的Node的包。比如过滤器插件hexo-filter-auto-spacing,它的文件清单如下:
- lib
- renderer.js
- README.md
- index.js
- package.json
其中有用的也就是package.json和index.js。而package.json也就是典型的Node包文件,它的输出对象由main字段指定,本例中main字段指向index,也就是我们的index.js文件。
看一下index.js内容
var assign = require('deep-assign'); |
再看一下/lib/renderer.js的内容
var reg = /(\s*)(```) *(.*?) *\n?\[hide\]([\s\S]+?)\s*(\2)(\n+|$)/g; |
太简单了,对于上面这个例子,就是实现了过滤器的定义
hexo.extend.filter.register(type, function(data){ |
照猫画虎
与Hexo项目文件并排新建一个文件node_modules,并在里面新建项目hexo-image2asset。结构如下:
├─guide2it-blog |
至于为什么要这样,这都是血的教训。对于Node项目,新建模块应该在/guide2it-blog/node_modules下面,我之前也是这样建立的,后来因为莫名奇妙的问题,采用万能的修复大法delete node_modules & npm install之后,我的hexo-image2asset项目找不到了,驾鹤西去了。
而我把hexo-image2asset按上述方式布置,它也在Node项目的搜索路径上,也可以避免万能修复大法重蹈覆辙。
探究data的数据结构
为了弄清楚回调函数中data的结构,我决定用一个例子来测试。
请看2019-04-19-01测试插件.md的内容
--- |
然后我编写index.js,内容如下:
var deal_image=function(data){ |
执行hexo g激发渲染过程。
Document { |
原来这个data是一个Document,它的内容及结构如上所示。跟内容相关的主要有三个字段_content、content和raw,raw表示原始文章,_content这种带前缀_的一般是内部属性,不能动,那么就动content的内容。
按照资源对象的格式要求,应该把
转换为
{%asset_img guide2it.jpg 测试%} |
转换图片对象为资源对象
这个需要采用正则表达式来全局转换,被转换的字符串中有文章名字,这个需要首先找出来。
已知source形如_posts/2019-04-19-01测试插件.md,那么文件名应该是,找到最右边的/,其后的字符串,去掉.md。
建立正则表达式来进行替换,把[]内的内容用()确定为$1,把图片文件名用()定义为$2,最终的正则表达式如下。
插件的index.js完整内容如下。
var deal_image = function(data) { |
这里有个bug,替换对象为"{%asset_img $2 $1 %}"时,如果正则匹配的%1是纯数字,则它被解释为图片宽度,这好像就离题了。所以暂时把$1去掉。